Daizu Gohan ( roasted soy bean rice)


6

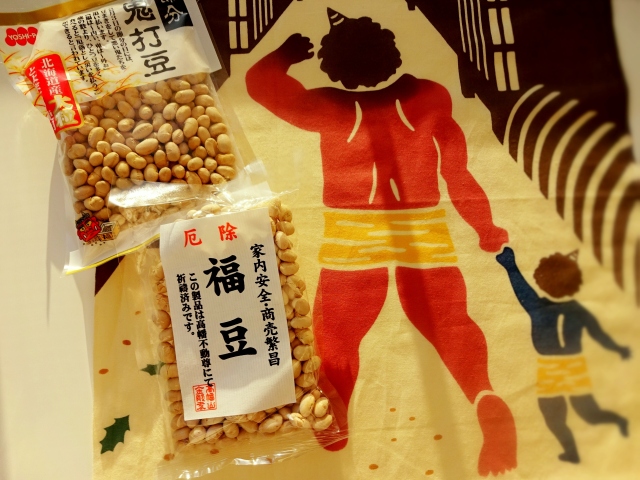
Setsubun , a throwing beans event, is gone.  We use soy beans for that, so my mom sent me soy beans far away from Japan.

I know we could get them here as well, but the  quality is different.

How could I throw these beautiful soy beans outside even though it was for the luck?

Besides they are purified by the prayer of the shrine.  That is why I pretended throwing them, and saved them for cooking.

Every year after this event, I look forward to making roasted soy bean rice with this intentionally left over soy bean.

This is not a fancy food at all and a  kind of a comfort food for me, so we needed it to rest our stomachs.

Yes, after Setsubun ,,,

47

we enjoyed fried chicken for super bowl!

It was my first time to make American style fried chicken, but it was a fun!


100

I don’t know the best way, but I brined them in the buttermilk mixture, and then steamed with a lid during frying.  It was a little scary, but successful.  You could imagine how much my husband enjoyed them.

So we needed some kind of gentle food like this not-fancy but delicious comfort rice.

Some of you may not like this rice because it has lots of UMAMI flavor including sardines, but this is definitely a strike for us Japanese.

Here are the ingredients for today’s dish.

  • 3 cup of white rice
  • 3.3 or a little more cup of water
  • soy beans
  • small dried sardines (niboshi)
  • kombu
  • shirodashi (salty umami liquid)
  • 2 teaspoons of sake


1

If you are not sure how to wash and rinse white rice, please check here.

After washing, drain for 30minutes, and then put dried sardines if you have.

The ones I used this time were small, so I didn’t need to take their guts and bone off.

100

If you use regular size dried sardines, you might want to take heads, remove the guts and bones because they are bitter. Then, split them lengthwise like the photo above.  When I opened a new package of dried sardines, I always do it at once, and store them in a canister in the fridge for the future convenience.

Ok, back to the rice.

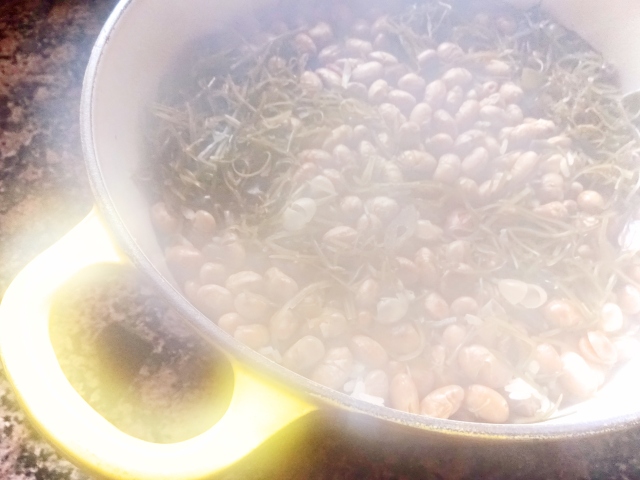
Roast the beans in the pan until they get fragrant, and add them on the top of  the rice.  Then add kombu.  I had shredded kombu, but if you use regular one, just cut 2-3inch, and put it on the rice.  After cooking, you can julienne it and return to the rice.

Then add water and sake.

I had enough umami flavor already, so it would help the rice t0 be flavorful without too much salt.  However if you want, you could add 2 teaspoons of shirodashi (if you want) or salt or soy sauce.

Then cook rice like we do for the regular white rice.

I waited enough for the rice to get steamed, so I think it is ready!


5

Nice aroma!


6

Fluff the rice, and that’s it!

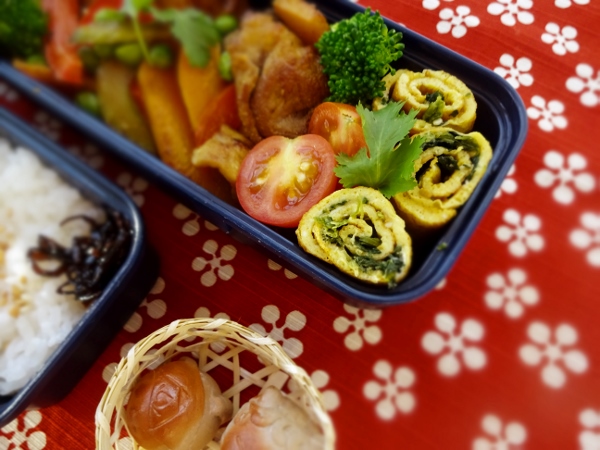
I put this rice in my husband’s obento.

36


I hope he liked it!

This is the comfort food for us…..

Oh, by the way,  could you see the meat ball behind the rice in the lunch box?

I will talk about it next time!


Final Episode of EHOMAKI!

s-DSC00852

Happy Valentine’s Day, everyone!

I know this coming Sunday is  St.Valentine’s Day, and I should write about chocolates,cookies, and bonbons, but we are still in,,,,,,


57 (600x450)

SETSUBUN!

If you come to my blog for the first time, please check the last two articles.

102

Yes, we are preparing those things for this final episode of EHOMAKI!

Finally we ROLL IT !

OK, let’s roll them!

So sorry to say this,   BUT we still have one more very important thing we need to prepare.

WE NEED RICE!

I already write how to cook white rice here,  but there are some different procedures, so I will show that again.

24 (600x450)

Here I have 3 cups of rice, washed and rinsed well like we did for white rice.  Then drain them and leave them in a colander for 30 minutes.

25 (600x450)

Differently from just white rice, I have KOMBU here.  You may notice that , I have two balls which I put every time I cook whatever rice.  They are potteries and they distribute the heat well. Of course you don’t need to have them.

26 (600x450)

Kombu has white stuff on the surface, but you don’t need to worry.  This is not mold. This is mannitol, which is one of  umami, a sweet agent in kombu, so please don’t wipe it off.  Just rub gently to take dirt ( if it has) with paper towel, and it is ready to go.

Place two pottery balls in the rice, and pour water.  This rice will have vinegar later, so we need to cook somewhat a little dry.  Here I use 3 cup of rice, and we need  10% more water of rice amount.  In my case, I use a 200ml cup ,so for my rice, I need 660ml of water.

After pouring the water, put kombu in it, and  leave it for 30minutes for rice to absorb the water slowly.

Now we need to prepare sushi vinegar.

30 (600x450)

Recently many grocery stores carry sushi vinegar or seasoned rice vinegar.  It is totally fine to use it, but sometimes it may contain corn syrup, so you might want to check the ingredients.  It should be rice vinegar, salt and sugarHow simple is that?

For one cup (200ml) of  rice, we need 20-25ml of vinegar, 4-5g of sugar, and 2.5g of salt.

I use 3cups of rice, so I need 60ml-75ml of vinegar, 12-15g of sugar, and 7.5 g of salt.

Most of the stuffing of my EHOMAKI has already cooked with sugar, so this ratio is not that sweet.  If you like sweet rice, you could increase the amount of sugar.

In a small sauce pan, put them all and heat it until salt and sugar dissolve.  Please don’t boil it!  The flavor of vinegar will be gone!

While you cook rice, prepare the large bowl and a fan.

38 (600x390)

This is SUSHI OKE, a sushi rice container made of wood.  This absorbs unnecessary water, but at the same time leaves rice moist.  FANTASTIC!

My mom send this to me a while ago, and this is my first time to use.  Until then, I was using glass bowl (non reactive bowl), so it is totally fine for you to use a regular bowl, but you need a large one.


OK, rice is cooked!   Take kombu out, and fluff the rice with a large spoon lightly.  Then ,


43 (600x450)

transfer the rice to a large bowl, in my case into sushi oke.


Now you have cooked rice and sushi vinegar in front.

READY?


39 (600x444)

The reason I told you to prepare a large bowl and a FAN is because,,,,


42 (600x450)

we need to make wind while mixing rice with sushi vinegar!

WHY?

One of the reasons is because rice shines when it cools down with sugar quickly.  The other reason is that we want rice to absorb vinegar, that is why as soon as rice is cooked, we put vinegar.  However at the same time, we don’t want rice to too wet , so we need to cool and dry rice to prevent too much absorption.

Don’t you think this work needs more than one two hands?

YES!

I called my husband to make wind!  I was lucky.

When I was a kid, I was always asked to do that by my grandma.  That is a sweet memory…


40 (600x450)

You could adjust the amount of sushi vinegar.  After mixing some, taste it, and you can stop whenever you want.

Now we have sushi rice ready.

Finally we can roll!

Before roll sushi rice, please prepare 1:1 ratio of water and rice vinegar mixture for wetting hands.  Otherwise the rice stick to your hands.


44 (600x450)

We have sushi rice, vinegar and water mixture, a bamboo mat, and seaweed!

45 (600x450)

Everything is ready!


46 (600x450)

Place a sheet of seaweed (nori) on a mat, short side in front.

By the way, do you know there is two sides for nori?  The smooth side is supposed to be seen, so in this case, the rough side is up, the rice side.


Then,,


wet your hands with the vinegar mixture, and grab rice and place it on the seaweed.

300g of sushi rice would be good for one big roll.

We will put ingredients in the middle of the rice, so we need to make an indentation in the middle.  The thickest part is the front and then the back, and the middle.

Don’t put rice at the far edge of the seaweed.  Leave about 1 inch.

49 (600x450)

Now place the ingredients in the middle.  If some stuffing is shorter than the length, like egg here, adjust the length, adding some.

Like rolling cakes, rolling sushi makes me excited and also nervous.

I have to do it at once!


50 (600x450)

GO! GO! GO!

ROLL IT!  ROLL IT! ROLL IT!!

You have to roll tight, but don’t squash the rice.

Try to the end of the mat into the roll and make shape for finishing.


51 (600x450)

Finish!

52 (600x450)

You can serve as it is, but for it to be looked neat, let’s cut the edges.


55 (600x450)

Wet the paper towel with the left over the vinegar and water mixture, and apply it to the knife.


63 (600x450)

Now we can eat!

As I mentioned in the previous article, when you eat this, you have to face this year’s lucky direction.  This year South Southeast!

Ohhhhh, I wish I could show you my husband’ eating this.

I don’t know why, but he stood up and held the sushi in both hands,and finished it!

He will be healthy all year long!


56 (600x450)

Would you like to be healthy and  get luck, eating EHOMAKI?


EHOMAKI PART2 -7 ingredients-


59 (600x467)

As I mentioned in the previous article, February the 3rd is a very traditional Japanese event called SETSUBUN, and there are several things we do on that day, including throwing soy beans towards ogres.  As well as seasonal events in the US,  some Japanese events are associated with foods, and SETSUBUN is not an exception.  That makes events more exciting, don’t you think?

I have a Japanese style omelet ready, so let’s move on to other ingredients for EHOMAKI and, finish making it and eat it!

Along with TAMAGO YAKI, we need to prepare more stuffs.  It is told that we need seven kinds of ingredients in total.  To be honest with you, I didn’t know that.   At the dinner table,  my husband told me that, holding  in both hands a big sushi roll which only had six ingredients.  HA HA HA….

You could put whatever you want! 

Tuna, salmon, avocado, alfalfa, broccoli sprouts, asparagus, shrimp, and ANYTHING!

Anyway I will briefly show what I prepared besides TAMAGO YAKI.

Here are what I prepared for my sushi roll.


One of them is cooked shiitake.

I soaked dried shiitake in the water over night, and take stiff axes off, then cooked them their own liquid with soy sauce and sugar until they absorbed all the liquid.

By the way, I kept axes for that night’s miso soup!


Next I cooked carrots.

Peal them, and cut them vertically.  Then cook in dashi stock with a little sugar.

I use shirodashi again here since it has both saltiness and umami flavor, so we don’t need to make dashi from the scratch.

Cook them for about 5minutes, then drain it.  You can throw the liquid here.

Cool them completely.


Then move to the other ingredient, green beans.

To keep the green color bright, cook them for 2 minutes in the boiling water, and shock them in the cold water (the left photo).

Then cut them diagnostically, and cook them for the second time with shirodashi and sugar.

Cook them for about 2 minutes, and drain and cool them flat.

Then,,,

cucumber!

We need to cut it vertically as well.  Make sure you have enough length of the length of NORI, seaweed.

OK.  Now we have,,,


4 (2592x1944) (600x450)

TAMAGO YAKI, cooked shiitake, cooked carrots, cooked green beans, cucumber, and KANPYO (the upper left in the photo).

WAIT!  I didn’t see you preparing KANPYO and WHAT IS KANPYO?


32 (600x450)

Sorry, I cheated it.  My mom sent this prepared KANPYO from Japan!  Kanpyo is dried shavings of calabash, a type of gourds.  Dried KANPYO is long and white, and this one was already cooked with soy sauce and sugar, that’s why they are brown.

Now including KANPYO, we have 6 ingredients.  I add one more while I was rolling.  That is,,,,


OF COURSE, LOVE!!!


By the way, this article is getting longer again, and we don’t have even rice yet.

What would you do?


I would do,,,,,,

56 (600x450)

I would introduce how to prepare sushi rice and how to roll it in the next article.

I promise!

SO,,,

See you soon!


EHOMAKI PART 1 -tamago yaki-

1

February the 3rd is SETSUBUN, a very traditional Japanese event.

SETSUBUN literally means ”division of seasons“.  It is used to mark the end of winter according to the old lunar calendar, which we don’t use any more.

However, the most of our seasonal events follow the lunar calendar, and we keep SETSUBUN as well.

On this day, we throw soy beans from inside of our houses to the outside, saying ONI HA SOTO, FUKU HA UCHI, evil out and happiness in.  Usually ogres are the symbol of evil, so one of family members has to play this role, putting a mask of an ogre on the face, and be a target of throwing beans.  Of course, usually fathers do this role. No question.

We throw beans at night.  On the same night for the dinner, we have EHOMAKI, a big and long sushi roll.   We shouldn’t cut the roll.  While eating, we wish for our health and happiness, and should eat it at once without breath.  We hold this sushi by both hands, and  eat it as if it is a burrito.

When we eat this roll, we have to face toward the year’s lucky direction.  This year the direction was South-southeast.


61 (600x450)

Eating a long sushi roll on SETSUBUN has been a KANSAI (west side of Japan) area’s long tradition, but  Seven-Eleven had started this as sales promotion in 90s, then it spread quickly because Japan is a small country!

That’s why I didn’t have EHOMAKI when I was a kid.  I lived in Tokyo.  The first time I had EHOMAKI was when I was here in the US!

Now because I am away from my home country, I am trying to be a JAPANESE harder, so I have to make EHOMAKI like many Japanese people do!


15 (600x450)

I would like to show how to make EHOMAKI, but before that, I would write about TAMAGO YAKI, one of the ingredients of EHOMAKI.


20151013031831690

TAMAGO YAKI is not only the stuffing for sushi roll, but this could be a dish!

We eat TAMAGO YAKI for breakfast, put it in obento, and also many IZAKAYA style restaurants offer this as appetizer.

TAMAGO YAKI is very simple and very Japanese, and everyone loves it.

Each house has its flavor, a little sweet or a little salty.

My mom makes it a little salty, so I like that way, but we could change depending on situation.

Here is how to cook TAMAGO YAKI.

Ingredients are 3 eggs, shirodashi (you could use salt instead), and oilThat’s it!

However we need special equipments.  Makisu, bamboo mat, and a special pan for TAMAGO YAKI.


30 (600x450)

You could use a regular pan, but there is a pan only for TAMAGO YAKI in Japan.

I believe every mother has one in her kitchen.

My mom sent this pan for me 10 years ago, and this is not the popular style.

This is an easy TAMAGO YAKI maker, and it curves for us to roll eggs easily from one side to the other.

You have no idea what I am talking about, so I will show you.


31 (600x450)

By the way, when you cook eggs, do you take the chalaza off?

In Japan, I think many people take this, and I had been seeing my mom always taking that, so I thought it was so crucial.  When I took a biology class here in the US, I learned this is not harmful at all.

I get accustomed to not taking this, but when I want eggs to finish smooth, I take it off.

Then beat the eggs.  I heard that when you make omelet, we need to beat at least 80times with a fork.  I do that for omelet.


You can use salt for eggs, but I used shirodashi because it has UMAMI flavor along with saltiness.

Add a just half teaspoon of shirodashi or salt.

Heat a tamago yaki pan or a regular small sized pan well with a little oil, pour about 1/4 of beaten egg to the pan, then immediately distribute it evenly.

When the most of the surface looks cooked,


roll the egg towards the other side with a spatula.  Roll it until it hit the other end.


If necessary, wipe the pan with a paper towel with a little oil again, then pour another 1/4 of egg to the pan.

Here is a key. Try to pour the egg under the cooked part.  That way it attaches the cooked part.

Then like the first roll, distribute the egg evenly, and when it looks cooked, roll it towards the other side, in my case, towards the right.


41 (600x450)

Then repeat the same  another one or two time.

If you prefer sweet TAMAGO YAKI using some sweet agent, it easily gets burned, so do quickly.


40 (600x429)

This is going to be my 4th time roll.

When you finish rolling, put the cooked egg onto a bamboo mat.


42 (600x450)

Here the egg is a kind of cylindrical shape.   You can eat as it is, just cutting into several pieces horizontally.

I want this egg to be in my long sushi roll, so I want to cut it vertically.

For that, I want it to have angles.

That’s why I need this bamboo mat!

When you make sushi rolls with this mat, this helps sushi to be round, but also this could help egg to be angular.


43 (600x450)

While the egg is still warm, make angles with this mat and leave it.


44 (600x450)

That’s it!

When it gets cool, I cut this vertically into 6 pieces.


47 (600x450)

I like the smell of TAMAGO YAKI.


New Image (600x450)

You could put this in obento like this.


46 (600x450)

Did you get how to make TAMAGO YAKI  now?

Now I could move on to the main topic, EHOMAKI!

That will be in my next article!

I am so tempted to eat this TAMAGO YAKI, though……


Curry flavored pork sautee

3 (600x450)

When I prepare obento (lunch box) for my husband, I try it to be not boring in both appearncewise and tastewise.  I wake up at 5 am every day, and the first thing I do  after washing my face is to stand and think in the middle of my  kitchen.

What can be the main dish?  Then, what color can I have?  Flavor?  Japanese or other?

Within 30 seconds, I start moving as if I am somebody who is  challenging in the iron chef.

I open the window even though the outside is 32F.  I have to wake me up REALLY.

After 30minutes or so, the best part is coming.

Put them together in  this small box.

How can I put everything neat for it to look delicious?


Today I reached thinly sliced pork butt.  I decided to go to curry flavor, but I wanted it to be something Japanese, so I used curry powder and soy sauce together.  They match so well.


30 (600x450)

Here is what I did.

  1. Massage the pork with a little bit of shiokoji and leave it while preparing other dishes.
  2. Wipe off shiokoji from the pork, and cover the pork with flour.
  3. Heat the pan with a little oil, and sautee the pork.  Set aside.
  4. Sautee  vegetables, in my case purple onion, green pees, orange pepper, red pepper, and thinly sliced butternut squash.
  5. Return the pork and add 1 teaspoon of curry powder.
  6. While sauteing, prepare the mixture of soy sauce, sake, sugar, and mirin.  All of them are 1 teaspoon respectively.
  7. Add the mixture at once, and sautee a little more.

That’ s it!

Adding soy sauce and mirin makes this dish Japanese.

I like to use curry powder in various dishes, but when I use it for Japanese dishes, I use S&B brand’s.

1 (600x450)

I used this for Rintaro’s curry.

I always have MY curry powder in stock, but they have more like Indian.

2 (600x450)

So I decide which I should use , depending on a dish type.

By the way,  you have to cool it completely like I do in the photo before putting it into a box.

Otherwise the warm temperature makes bacteria happy. We don’t want it to be happy!

Besides the pork, for this obento, I prepared egg.  I try not to rely on egg dish every day, and when I have to rely on, I don’t make egg dish for the breakfast.  Today I didn’t use an egg for breakfast, so I happily relied on it!

15 (600x450)

Just doing omelet is not fun at all, and more over, this GURU GURU TAMAGO (I named  it.  Guru guru means “round and round” in Japanese, and tamago means egg.) only requires one egg!

In a heated pan with a little oil, just pour  egg beaten with a little salt (in my case I use a little SHIRODASHI, concentrate dashi stock with saltiness).

Actually I put one more thing besides shirodashi to enhance the yellow color and for his health.  That is TURMERIC!

Especially when I use egg white only, I put turmeric.  When you add turmeric, don’t add directly to an egg because it gets crumbled in the egg.  Mix a little bit of turmeric with a little amount of egg or water, and then pour it into the left of the beaten egg.

Also be careful of the amount of turmeric.  Turmeric has a bitter taste, so just a pinch would be good.

After pouring the egg, swirl the pan for letting the egg distribute evenly.  Before it is cooked through, put cooked spinach (mine was freeze dry) on the egg, and set it aside as it is on a plate.  While it is warm, just roll it!

That’s it!

Then after cooling down, you can cut it into three to four.

I like this appearance, so I do often, but every time I change ingredients.

Sometimes dried shrimp, sometimes seaweed, sometimes sesame seeds, sometimes green onions, and so on.


On the other side of this obento, I put,,,


8 (600x450)

snow peas with sesame seasoning.

I have already introduced how to make GOMA AE with burdock.

We could use the same sauce here with cooked snow peas.

He would love all these dishes, but  the most exciting part of this obento is


14 (600x450)

UMEBOSHI, plum pickle!!

We call this type of obento as HINOMARU BENTO.

We call our national flag as HINOMARU.  “HI”is sun, “no”is of, and “MARU” is circle.

As you may know, our flag is like umeboshi in the middle of white rice!

Don’t you think so?

Mine has a line of sesame seeds, but this is HINOMARU!

This umeboshi is so plump that I don’t know if I could put lid on tight.

It is obvious that umeboshi gets smashed…..
Anyway, I hope my husband enjoys this obento!


19 (600x450)

By the way, I always use this two balls (to be precise, they are an ogre and a boy) when I cook white rice in a pot.

If you would like to learn again how to cook white rice, please click here!

We are now in February, and an ogre is coming to you.

I will talk about that in the next article!

See you soon!